.jpg)
How to build a high-performance Chatbot with Dialogflow?
What’s a Rich Text element?
The rich text element allows you to create and format headings, paragraphs, blockquotes, images, and video all in one place instead of having to add and format them individually. Just double-click and easily create content.
Static and dynamic content editing
A rich text element can be used with static or dynamic content. For static content, just drop it into any page and begin editing. For dynamic content, add a rich text field to any collection and then connect a rich text element to that field in the settings panel. Voila!
How to customize formatting for each rich text
Headings, paragraphs, blockquotes, figures, images, and figure captions can all be styled after a class is added to the rich text element using the "When inside of" nested selector system.
Dialogflow is an advanced natural language understanding platform (or Natural Language Processing platform) which allows you to build complex conversational Artificial Intelligence (AI) tools like chatbots and voicebots. In other words, when integrated into bots, Dialogflow can decrypt users input by analysing written words and phrases, or speech. It can then produce appropriate answers by sending automated texts or synthetic audios.
For example, if I am a retailer and one of my customers says "I want to buy an apple", I actually want to add an apple to the customer's basket. So I need an action and some details about this action. Basically, I need to know that :
- I must add something into the customer's basket -> that's the intent
- What something to add into the basket ? -> that's the entity
That's what Dialogflow does ! It extracts information from text and changes it into something that a website or another computer system can use. You can checkout our article on Dialogflow fulfillment webhook to understand more about intents and entities
By using Dialogflow, developers do not have to build their own machine learning models. It is basically a tool that enables developers to do machine learning even if they don't have the time or the ability to do it themselves.
Chatbots are conversational agents programmed to instantly and automatically answer users’ questions. They can be used in various fields, to fulfil a plethora of roles ranging from helping customers pick out a product to facilitating recruitments for HR departments. In a digitised and interconnected world, chatbots are a real asset to businesses. More and more choose to take the plunge and implement a chatbot into their company, then not only offering a more tailored service to their clients thus drastically improving customer relationship, but also freeing up employees’ time by automating most repetitive tasks.
Why should you use Dialogflow to build a chatbot?
By analysing users’ input through NLP and then creating appropriate answers, Dialogflow makes chatbots more human-like. Although, according to Gartner, most people don’t mind, and actually quite like, speaking to a robot, it is still much appreciated to try and make your chatbots as able as possible to have flowing, natural, and friendly conversations with users. Dialogflow can help you do that. Also, as it uses Machine Learning, it will allow your chatbot to keep improving by learning from interactions with clients.
Dialogflow can be deployed on multiple platforms and devices which makes it even more interesting. You will be able to publish high-performance chatbots on Facebook, Teams, Slack, and users will have the choice of utilising it on their computer, phone, or even tablet. On the other hand, you will always be able to keep an eye on your chatbot’s analytics and thus monitor your chatbot’s progress as Dialogflow has a built-in dashboard from which one can visualise all inputs and intents.
Why would I need a Dialogflow Tutorial?
Dialogflow can be quite hard to handle at first. However, with a step-by-step tutorial it becomes rather easy to understand how it works and how to use it. By integrating Dialogflow into your Ideta chatbot, you will be able to use plenty of functionalities like NLP and Machine Learning. Likewise, Ideta is a great addition to Dialogflow as it will allow you to carry out many different operations inside your chatbot’s bubbles (quick replies, connecting an API, etc.), save users’ inputs, or even create web-hooks, that is to say automated messages directly sent from the software to some users when something specific happens.
A step-by-step Dialogflow tutorial:
The first step of building your chatbot is to define its purpose and the channels on which it will be deployed. To do so, you could build a tree of possibilities. Once, you’ve mapped out your strategy, you are ready to start building your chatbot for real, and therefore to connect it to Dialogflow so that you can use all the best functionalities Ideta has to offer.
Step 1 - Set your account and create an agent:
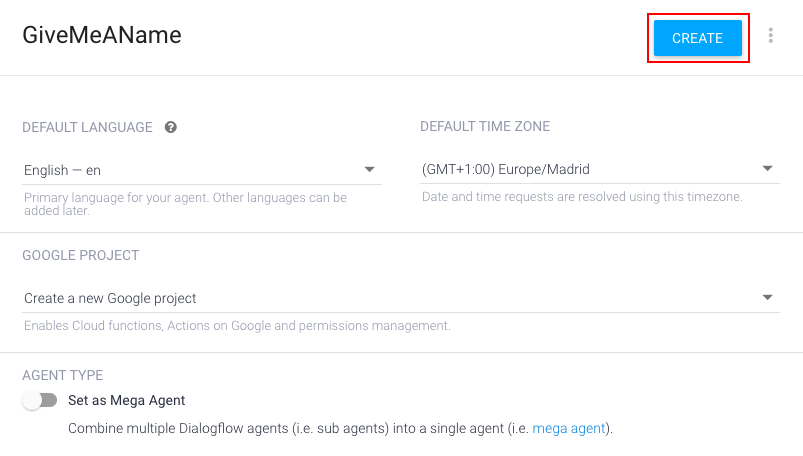
Start by creating a Google account and a free Google Cloud Platform account. Once this is done, open a new tab and go to Dialogflow’s website. Create a free account using the email you will have just created. On your Dialogflow account, in the drop down menu in the top left corner of your screen, click on “Create new agent”, name it and click on “Create”:

You will then be able to click on the gear button at the top left of your screen and open the link written in front of “Project ID”. This link will directly redirect you to Google Cloud Platform. By following these steps, you will have created your Google Cloud Platform and Dialogflow accounts, as well a new agent. You will thereby be ready for the next step, that is to say connecting Dialogflow to your chatbot.
Step 2 - Connect Dialogflow via Ideta:
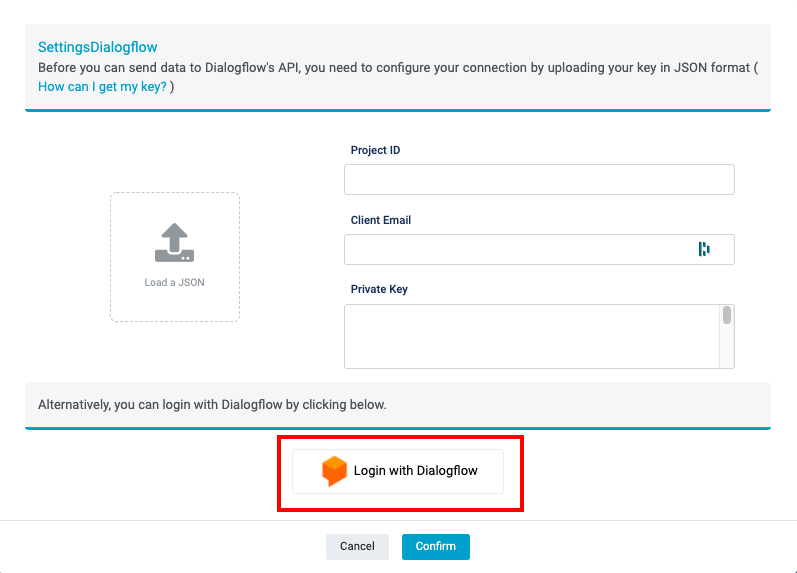
Connecting your chatbot to Dialogflow can be quite challenging, that is the reason why we created an alternative: you can directly connectect Dialogflow to Ideta
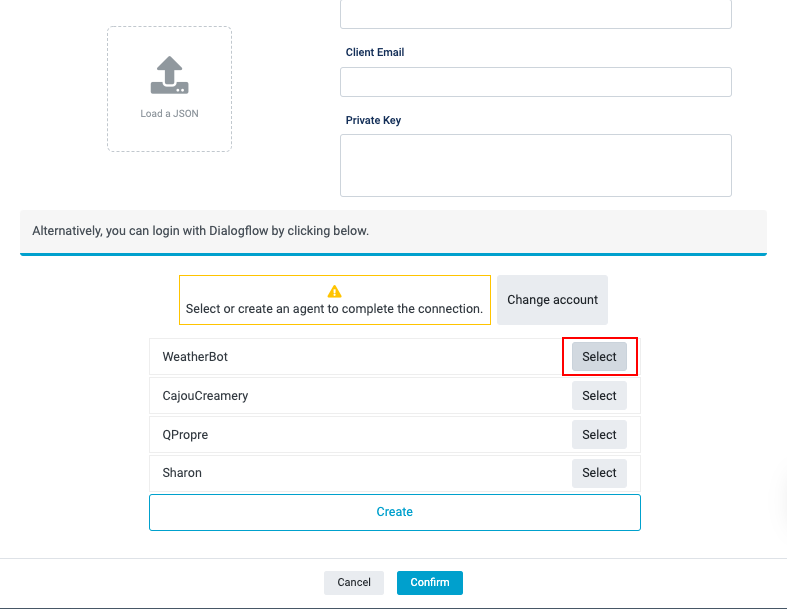
After creating your Google Cloud Platform, go to your Ideta’s chatbot and click on « Connect my account », login with Dialogflow, then click on « create ». This will create an agent in Dialogflow and automatically upload the JSON file. Your chatbot will then be connected to Dialogflow. Easy, isn't it?
This method is way faster but you won’t be able to set up advanced features like quotas or intents limit in your Cloud. In order to be able to do this, you will have to directly go to your Dialogflow Cloud Dashboard. However, if you have a basic project, connecting to Dialogflow with Ideta is enough and can save you a lot of time.
Step 2 bis- Connect Dialogflow to your chatbot:
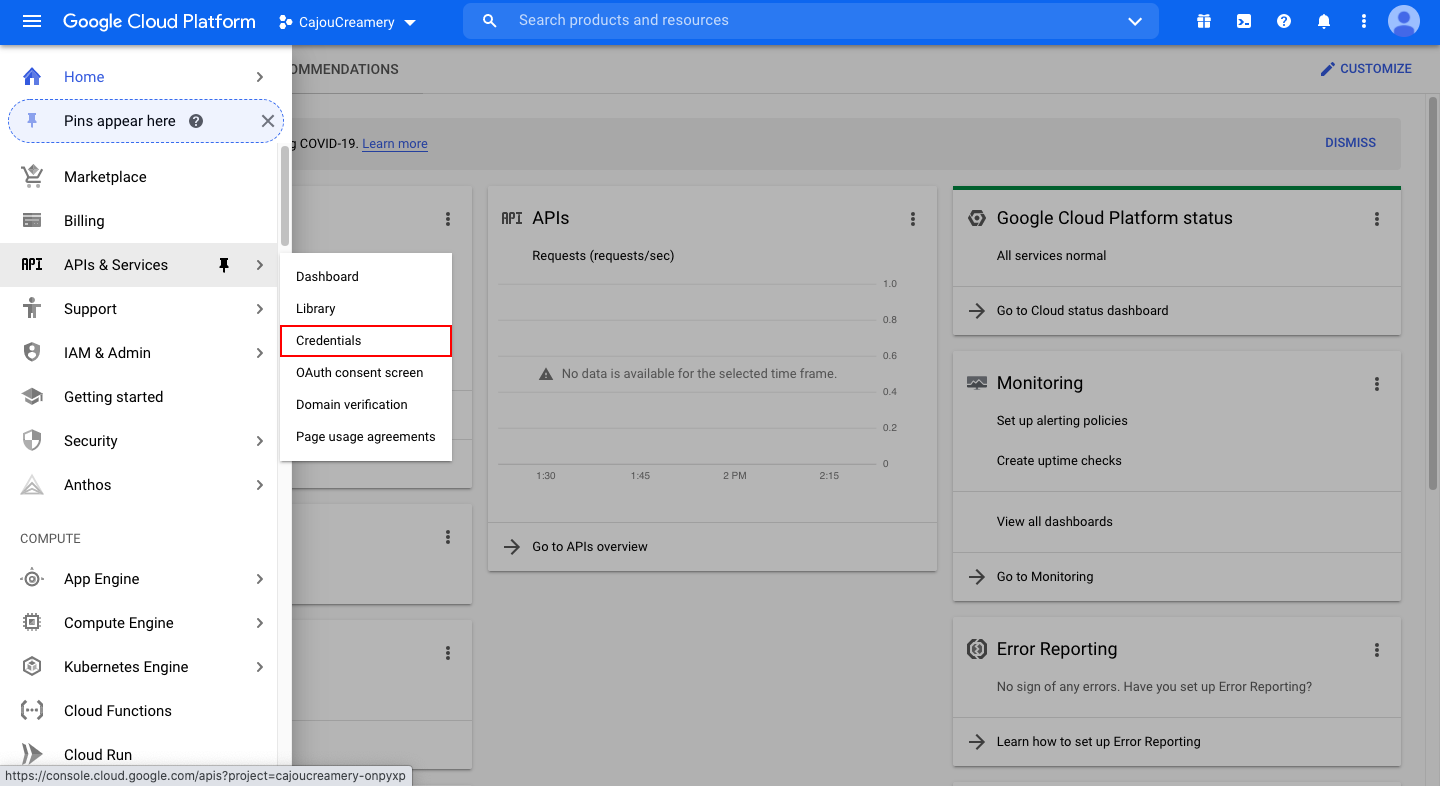
In the tab which popped open when you clicked on the “Project ID” link in the last step, go to “APIs & Services”, and then “Credentials”, using the drop-down menu at the top left corner of your screen:
Now, click the link below “Service Accounts”. Scroll down and click on “Add key” in the “Keys” section, then on “Create new key”, and “JSON”. Your JSON key will automatically be downloaded on your computer.
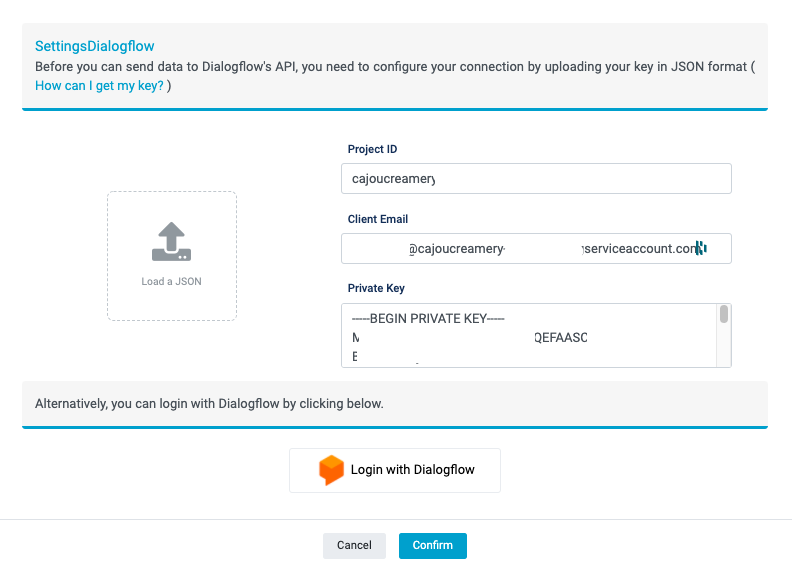
Once this is done, go to Ideta’s software and open your chatbot. In the AI section, click on Dialogflow, and then “Connect my account”. By uploading your JSON key, you will connect your chatbot to Dialogflow:
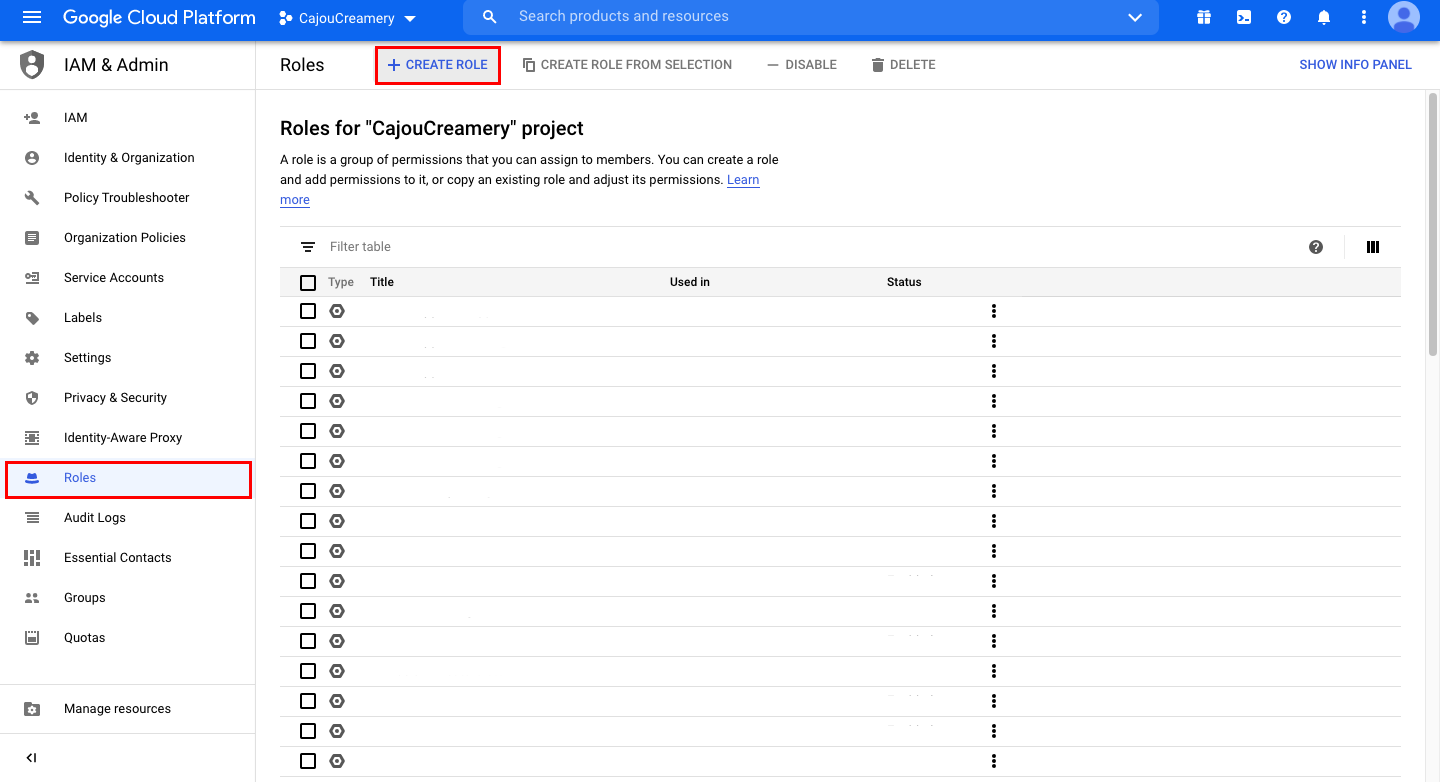
Optional Step: Give rights to agents
If you created the agent, you will automatically be the admin, but if you want to collaborate on a project you may have to give rights to your colleagues. To do so, you have to go to your IAM & Admin page and edit their role by clicking on the pencil. Go to Google Cloud resources to know more about each role. You can add new members by clicking on "Add" at the top left corner, enter their email address and give them a role.
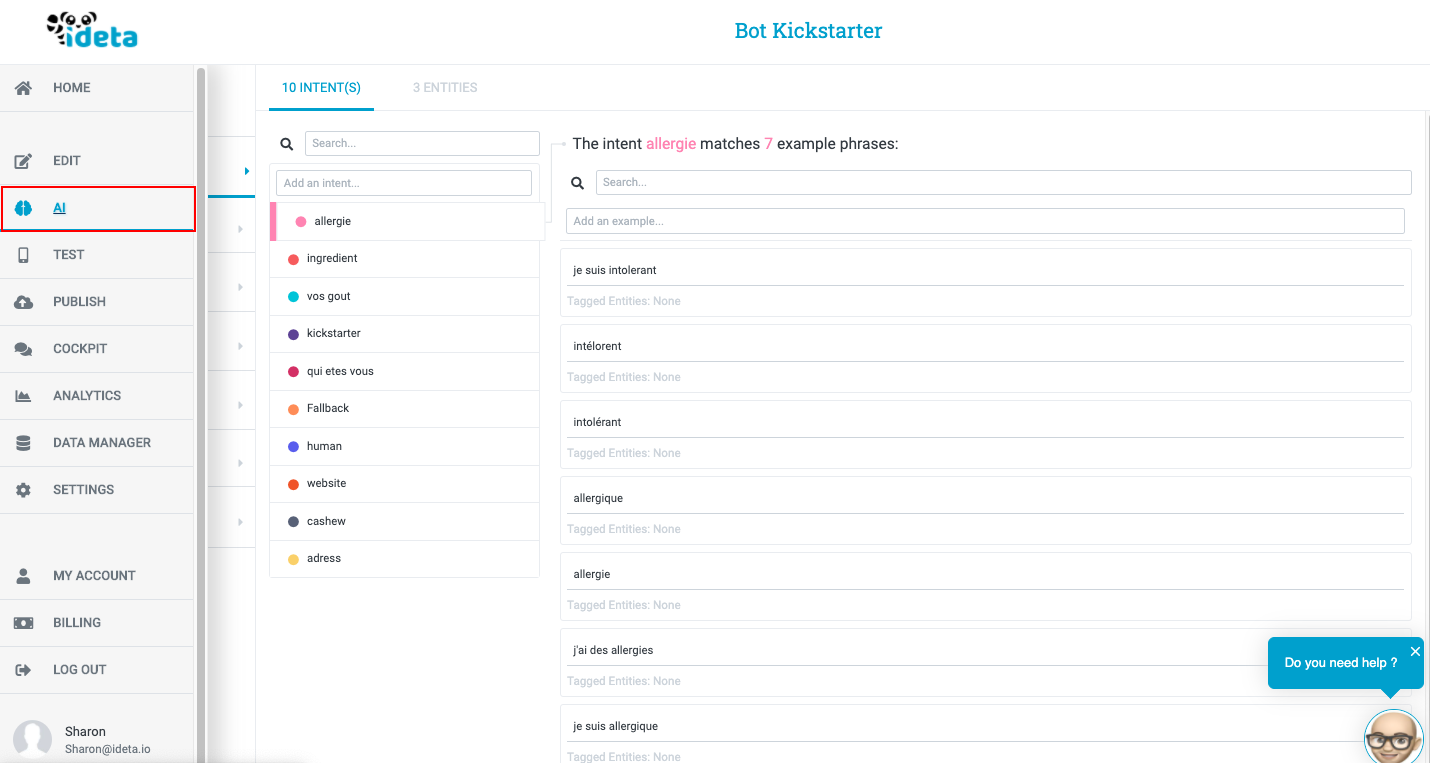
Step 3 - Add training phrases:
Once your Dialogflow account and your chatbot are connected, you can start adding training phrases in the NLP part of Ideta’s platform. By creating an intent, you will basically create a category in which you will be able to enter multiple example phrases. Example phrases will allow your chatbot to later on understand what users say and generate an appropriate answer. For each intent (or group of example phrases) you will be able to associate the appropriate answer in advance so that, when your chatbot will notice a similarity between one of the example phrases and the user’s request, it will automatically redirect him toward the programmed answer.
Why should you use Ideta for your Dialogflow chatbot?
Connecting Dialogflow to Ideta’s software makes it way easier to create a chatbot. You won’t need to add any line of code to create your chatbot and to use NLP. As previously said, Ideta offers many more functionalities like web-hooks, operations on data, user input saving, etc. By using the cockpit, you will also be able to visualise all your chatbot’s conversations and to take over if the chatbot can’t answer the client’s request.
Latest News


